In today's world of technology, the Internet of Things (IoT) has become a revolutionary field, and Raspberry Pi plays a pivotal role in enabling beginners to dive into this exciting domain. If you're a beginner looking to explore SSH Raspberry Pi IoT projects, you're in the right place. This article will provide you with all the essential information you need to get started on your IoT journey.
Understanding how to utilize SSH (Secure Shell) on a Raspberry Pi opens up endless possibilities for remote control and automation. IoT projects for beginners using Raspberry Pi not only enhance your programming skills but also empower you to create real-world applications. From automating home appliances to building smart devices, the potential is limitless.
As a beginner, it's crucial to grasp the basics of Raspberry Pi and SSH before diving into complex projects. This guide will walk you through the essential concepts, tools, and step-by-step instructions to help you build your first IoT project. By the end of this article, you'll be equipped with the knowledge to embark on your IoT adventure with confidence.
Read also:Desire Movies In Exploring The World Of Passionate Storytelling
Table of Contents
- Introduction to SSH
- Raspberry Pi Overview
- Why SSH for IoT Projects?
- Setting Up SSH on Raspberry Pi
- Basic IoT Projects for Beginners
- Advanced IoT Projects
- Tools and Software Required
- Troubleshooting Tips
- Best Practices for SSH Raspberry Pi IoT Projects
- Conclusion
Introduction to SSH
SSH, or Secure Shell, is a cryptographic network protocol used for secure communication over unsecured networks. It enables users to remotely access and manage devices like Raspberry Pi securely. For IoT projects, SSH provides a reliable way to control and monitor devices without being physically present.
Key Features of SSH:
- Encrypted communication for enhanced security
- Remote access to Raspberry Pi from any location
- Supports file transfer via SCP (Secure Copy Protocol)
Variations of SSH Protocols
SSH has evolved over the years, and there are multiple versions available. The most commonly used versions are SSH-1 and SSH-2. SSH-2 is preferred due to its improved security features and better performance. When working on IoT projects, ensure that you're using the latest SSH version for optimal results.
Raspberry Pi Overview
Raspberry Pi is a small, affordable, and versatile single-board computer designed to promote learning and experimentation in technology. It has gained immense popularity among hobbyists, students, and professionals for its ability to support various applications, including IoT projects.
Key Specifications of Raspberry Pi:
- Processor: Broadcom BCM2835 or later models
- RAM: Varies from 512MB to 8GB depending on the model
- Connectivity: Wi-Fi, Bluetooth, Ethernet
- GPIO Pins: For connecting external devices and sensors
Why SSH for IoT Projects?
Using SSH for IoT projects offers numerous advantages. It simplifies remote management, enhances security, and allows seamless integration with other systems. For beginners, SSH Raspberry Pi IoT projects provide hands-on experience with both hardware and software components, making it an ideal learning platform.
Read also:New Movierulz Kannada Your Ultimate Guide To Kannada Movies
Benefits of SSH in IoT
Here are some key benefits of using SSH for IoT projects:
- Secure remote access to devices
- Automation of tasks through scripts
- Monitoring and troubleshooting from anywhere
Setting Up SSH on Raspberry Pi
Before starting your IoT projects, it's essential to set up SSH on your Raspberry Pi. Follow these steps to enable SSH:
- Install the latest version of Raspberry Pi OS on your device.
- Connect your Raspberry Pi to a monitor, keyboard, and mouse.
- Open the terminal and type
sudo raspi-config. - Select "Interfacing Options" and enable SSH.
- Reboot your Raspberry Pi to apply the changes.
Configuring SSH Keys
For added security, configure SSH keys instead of relying on passwords. This ensures that only authorized users can access your Raspberry Pi remotely. Follow these steps to generate and configure SSH keys:
- Open the terminal on your computer and type
ssh-keygen. - Follow the prompts to create a public-private key pair.
- Copy the public key to your Raspberry Pi using
ssh-copy-id.
Basic IoT Projects for Beginners
Once you've set up SSH on your Raspberry Pi, it's time to start working on some basic IoT projects. These projects will help you understand the fundamentals of IoT and build a strong foundation for more advanced applications.
Project 1: Smart LED Controller
Create a simple IoT project by controlling an LED remotely using SSH. Connect an LED to one of the GPIO pins on your Raspberry Pi and write a Python script to toggle its state. Use SSH to execute the script from a remote location.
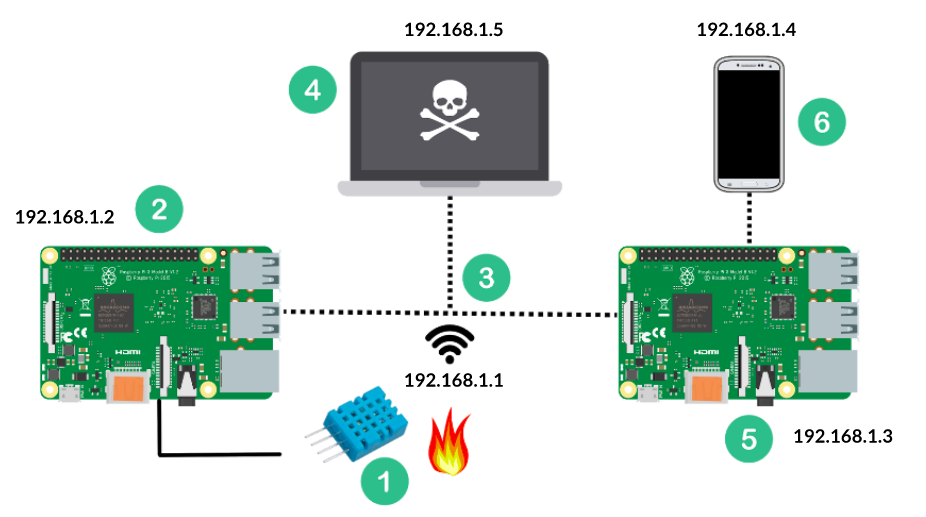
Project 2: Temperature and Humidity Monitor
Set up a temperature and humidity monitoring system using a DHT11 sensor. Connect the sensor to your Raspberry Pi and write a script to read the data. Use SSH to access the readings remotely and log them for analysis.
Advanced IoT Projects
After mastering the basics, you can move on to more advanced IoT projects. These projects will challenge your skills and push the boundaries of what you can achieve with Raspberry Pi.
Project 3: Home Automation System
Build a comprehensive home automation system that allows you to control multiple devices remotely. Use SSH to manage the system and integrate it with popular platforms like Google Assistant or Amazon Alexa.
Project 4: Smart Agriculture Solution
Develop a smart agriculture solution that monitors soil moisture, temperature, and humidity levels. Use Raspberry Pi to collect data from sensors and automate irrigation systems based on the readings.
Tools and Software Required
To successfully complete your SSH Raspberry Pi IoT projects, you'll need the following tools and software:
- Raspberry Pi (any model with SSH support)
- Raspberry Pi OS installed on an SD card
- SSH client software (e.g., PuTTY for Windows)
- Python or other programming languages for scripting
Troubleshooting Tips
Encountering issues while working on your IoT projects is common. Here are some troubleshooting tips to help you overcome common problems:
- Ensure SSH is enabled on your Raspberry Pi.
- Check your network connection for stability.
- Verify the correctness of your SSH commands and scripts.
Best Practices for SSH Raspberry Pi IoT Projects
Adopting best practices will help you achieve better results and avoid potential pitfalls. Here are some tips:
- Always use SSH keys for secure authentication.
- Keep your Raspberry Pi OS and software up to date.
- Document your projects and scripts for future reference.
Conclusion
SSH Raspberry Pi IoT projects for beginners offer an excellent opportunity to explore the world of IoT and develop practical skills. By following the steps outlined in this article, you can successfully set up SSH on your Raspberry Pi and embark on exciting IoT projects. Remember to embrace best practices and continuously enhance your knowledge to achieve greater success in the IoT domain.
We encourage you to share your experiences and projects in the comments section below. Feel free to explore other articles on our website for more insights into IoT and Raspberry Pi. Happy tinkering!