Remote access to a Raspberry Pi has become increasingly important for developers, hobbyists, and professionals who need to manage their devices from anywhere in the world. Whether you're working on a home automation project or running a server, understanding how to securely and efficiently access your Pi remotely is crucial. In this comprehensive guide, we will walk you through the process step by step, ensuring your setup is both secure and reliable.
As technology evolves, the ability to control and interact with devices remotely has become a necessity. Raspberry Pi, with its versatility and affordability, has become a favorite among tech enthusiasts. However, accessing your Pi remotely without compromising security can be challenging. This tutorial will help you navigate through the process with ease.
Whether you're a beginner or an experienced user, this guide will provide you with the knowledge and tools needed to set up remote access to your Raspberry Pi. From understanding the basics to advanced security measures, we've got you covered.
Read also:Unveiling The World Of Movierulescom Your Ultimate Movie Destination
Table of Contents
- Introduction to Raspberry Pi
- Why Access Pi Remotely?
- Preparing Your Raspberry Pi
- Setting Up SSH
- Using SSH Clients
- Securing Your Remote Access
- Advanced Security Measures
- Troubleshooting Common Issues
- Optimizing Remote Access Performance
- Conclusion and Next Steps
Introduction to Raspberry Pi
Raspberry Pi is a small, affordable computer that has gained immense popularity due to its versatility and ease of use. It is commonly used for projects ranging from home automation to media centers and even servers. One of the key features of Raspberry Pi is its ability to be accessed remotely, allowing users to manage and interact with their devices from anywhere.
In this section, we will explore the basics of Raspberry Pi and why remote access is essential for its functionality.
Key Features of Raspberry Pi
- Compact and affordable design
- Supports a wide range of operating systems
- Highly customizable for various projects
- Capable of running as a server or media center
Why Access Pi Remotely?
Accessing your Raspberry Pi remotely offers numerous advantages. Whether you're managing a server, monitoring home automation systems, or simply controlling your Pi from another location, remote access provides convenience and flexibility.
Here are some reasons why remote access is crucial:
- Convenience: Manage your Pi without being physically present.
- Efficiency: Perform tasks quickly and efficiently from any location.
- Security: Monitor and secure your Pi remotely.
Preparing Your Raspberry Pi
Before setting up remote access, it's essential to ensure your Raspberry Pi is properly configured. This includes installing the necessary software and setting up your network.
Steps to Prepare Your Raspberry Pi
- Install the latest version of Raspberry Pi OS.
- Configure your network settings.
- Update your system with the latest security patches.
By following these steps, you ensure that your Raspberry Pi is ready for secure and efficient remote access.
Read also:4 Movierulz Com Your Ultimate Guide To Understanding And Exploring Movie Streaming Platforms
Setting Up SSH
SSH (Secure Shell) is one of the most common methods for accessing a Raspberry Pi remotely. It provides a secure way to connect to your Pi over the internet.
Enabling SSH on Raspberry Pi
To enable SSH on your Raspberry Pi, follow these steps:
- Open the Raspberry Pi Configuration tool.
- Navigate to the Interfaces tab.
- Select SSH and enable it.
Once SSH is enabled, you can connect to your Pi using an SSH client from any device on the same network.
Using SSH Clients
There are several SSH clients available that you can use to connect to your Raspberry Pi. Some popular options include:
- PuTTY: A widely used SSH client for Windows.
- Terminal: Built-in SSH client for macOS and Linux.
- Mobaxterm: A powerful SSH client with additional features.
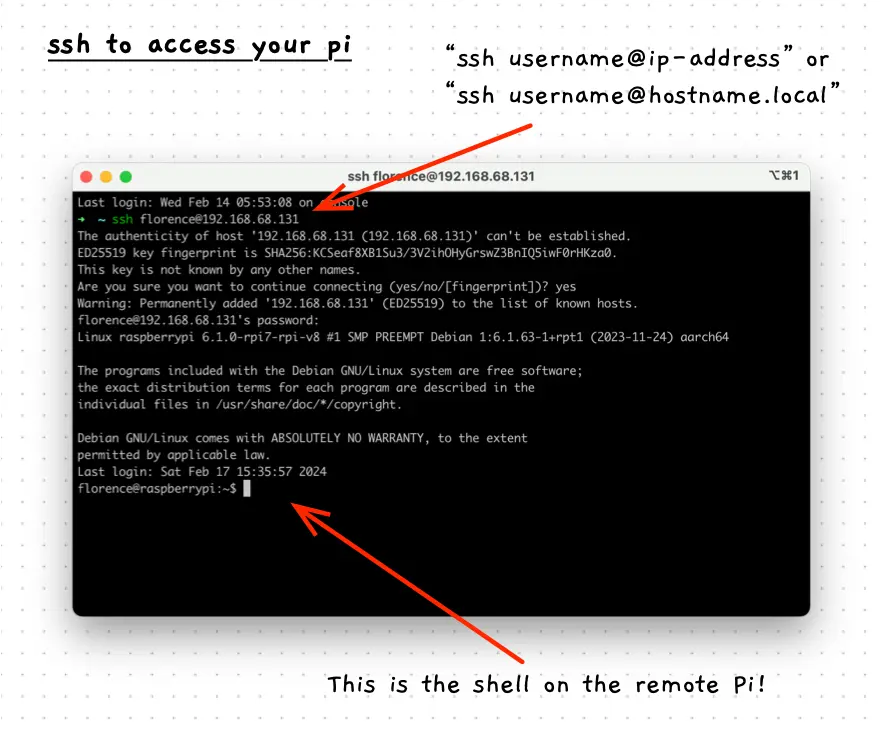
Connecting to Your Raspberry Pi
To connect to your Raspberry Pi using an SSH client, you need to know its IP address. Once you have the IP address, simply enter the following command in your SSH client:
ssh pi@your_pi_ip_address
Securing Your Remote Access
Security is a critical aspect of remote access. Without proper security measures, your Raspberry Pi could be vulnerable to unauthorized access.
Basic Security Measures
- Change the default password for the 'pi' user.
- Disable password authentication and use SSH keys instead.
- Limit access to specific IP addresses if possible.
Implementing these measures will significantly enhance the security of your remote access.
Advanced Security Measures
For those who require even higher levels of security, there are several advanced measures you can take:
- Use a Firewall: Configure a firewall to restrict access to your Pi.
- Implement Two-Factor Authentication: Add an extra layer of security by requiring a second form of authentication.
- Regularly Update Your System: Keep your Raspberry Pi OS and software up to date to protect against vulnerabilities.
Troubleshooting Common Issues
Even with proper setup, issues can arise when accessing your Raspberry Pi remotely. Here are some common problems and their solutions:
Connection Issues
- Ensure your Raspberry Pi is connected to the internet.
- Check your IP address and make sure it is correct.
- Verify that SSH is enabled on your Raspberry Pi.
Optimizing Remote Access Performance
Optimizing the performance of your remote access can improve your experience. Here are some tips:
- Use a wired connection for better stability.
- Compress data during transmission to reduce latency.
- Choose a reliable SSH client with good performance.
Conclusion and Next Steps
In this comprehensive guide, we have covered everything you need to know about accessing your Raspberry Pi remotely. From setting up SSH to implementing advanced security measures, you now have the tools to manage your Pi securely and efficiently.
We encourage you to take the following actions:
- Leave a comment below if you have any questions or feedback.
- Share this article with others who might find it useful.
- Explore our other articles for more tips and tutorials on Raspberry Pi.
Thank you for reading, and happy tinkering!